Spring MVC

一、配置web.xml文件

1、在web.xml文件配置 spring 容器启动监听器并指定容器的配置文件的位置,启动“业务层”的 spring 容器

1
2
3
4
5
6
7
8
9
10
11
12
13
14
15
<!-- 通过指定的spring配置文件和启动监听器,启动“业务层”的spring容器 -->
<?xml version="1.0" encoding="UTF-8"?>
<web-app xmlns="http://java.sun.com/xml/ns/j2ee"
xmlns:xsi="http://www.w3.org/2001/XMLSchema-instance"
xsi:schemaLocation="http://java.sun.com/xml/ns/j2ee
http://java.sun.com/xml/ns/j2ee/web-app_2_4.xsd"
version="2.4">
<listener>
<listener-class>org.springframework.web.context.ContextLoaderListener</listener-class>
</listener>
<context-param>
<param-name>contextConfigLocation</param-name>
<param-value>classpath:applicationContext.xml</param-value>
</context-param>
<web-app>

2、配置 SpringMVC 的 Servlet,默认查找<servlet-Name>-servlet.xml的 SpringMVC 配置文件,来启动web层的spring容器

1
2
3
4
5
6
7
8
9
10
<servlet>
<servlet-name>springmvc</servlet-name>
<!--默认加载 /WEB-INF/<servlet-Name>-servlet.xml 的Spring配置文件,启动web层的spring容器 -->
<servlet-class>org.springframework.web.servlet.DispatcherServlet</servlet-class>
<load-on-startup>1</load-on-startup>
</servlet>
<servlet-mapping>
<servlet-name>springmvc</servlet-name>
<url-pattern>/</url-pattern>
</servlet-mapping>

二、配置 SpringMVC 的配置文件 springmvc-servlet.xml

1、打开注解打开注解

1
2
3
4
5
6
7
8
9
10
11
12
13
14
15
16
17
18
19
20
21
22
23
24
<?xml version="1.0" encoding="UTF-8"?>
<beans xmlns="http://www.springframework.org/schema/beans"
xmlns:xsi="http://www.w3.org/2001/XMLSchema-instance"
xmlns:mvc="http://www.springframework.org/schema/mvc"
xmlns:context="http://www.springframework.org/schema/context"
xsi:schemaLocation="
http://www.springframework.org/schema/beans http://www.springframework.org/schema/beans/spring-beans.xsd
http://www.springframework.org/schema/mvc http://www.springframework.org/schema/mvc/spring-mvc.xsd
http://www.springframework.org/schema/context http://www.springframework.org/schema/context/spring-context.xsd
">
<!-- 需要在 controller 中注入的properties属性必须在 springmvc-servlet.xml 中读入-->
<!-- 加入 ignore-unresolvable="true" ,避免 could not resolve placeholder 异常-->
<context:property-placeholder location="classpath:config.properties" ignore-unresolvable="true"/>
<!--打开spring 包扫描功能,不可缺少-->
<context:component-scan base-package="org.demo.controller"/>
<!-- 打开mvc注解 -->
<mvc:annotation-driven/>
<!-- 将静态文件指定到某个特殊的文件夹中统一处理 -->
<!-- 一个*表文件夹中内容,第二个星指子文件夹中的内容 -->
<mvc:resources location="/resource/" mapping="/resources/**" />
...
</beans>

2、配置JSP视图解析器 InternalResourceViewResolver

1
2
3
4
5
6
7
8
9
<beans>
...
<!-- 配置 JSP 视图解析器(ViewResolver) 一般JSP使用 InternalResourceViewResolver -->
<bean class="org.springframework.web.servlet.view.InternalResourceViewResolver">
<property name="prefix" value="/WEB-INF/jsp/" />
<property name="suffix" value=".jsp" />
</bean>
...
</beans>

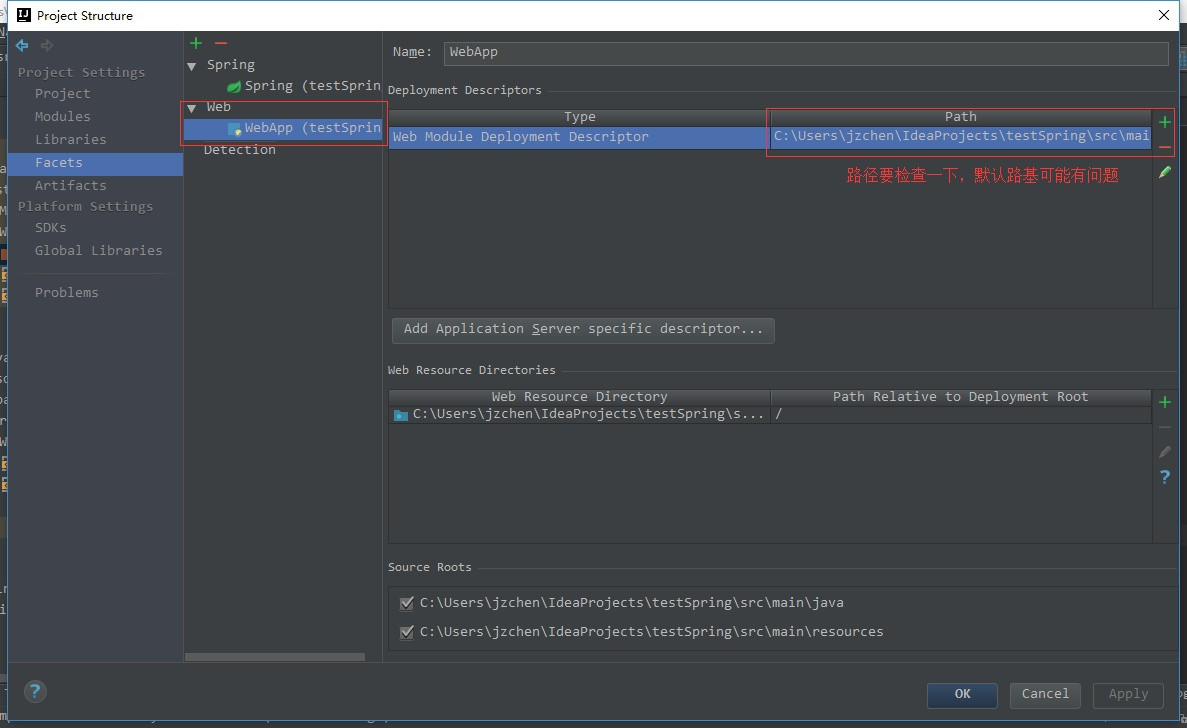
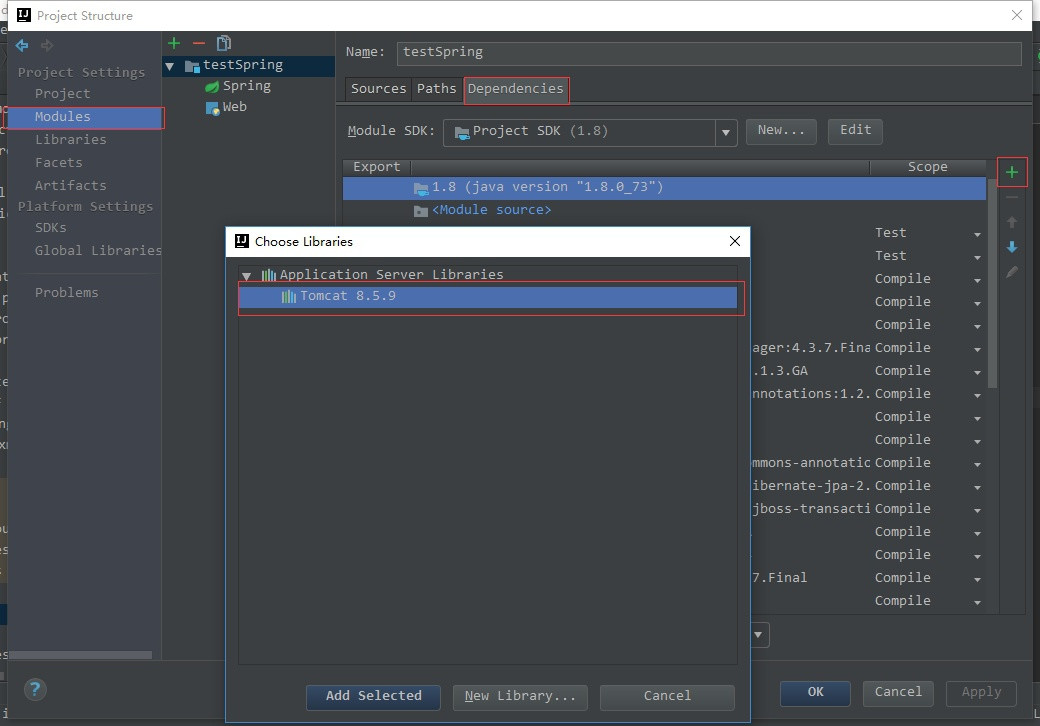
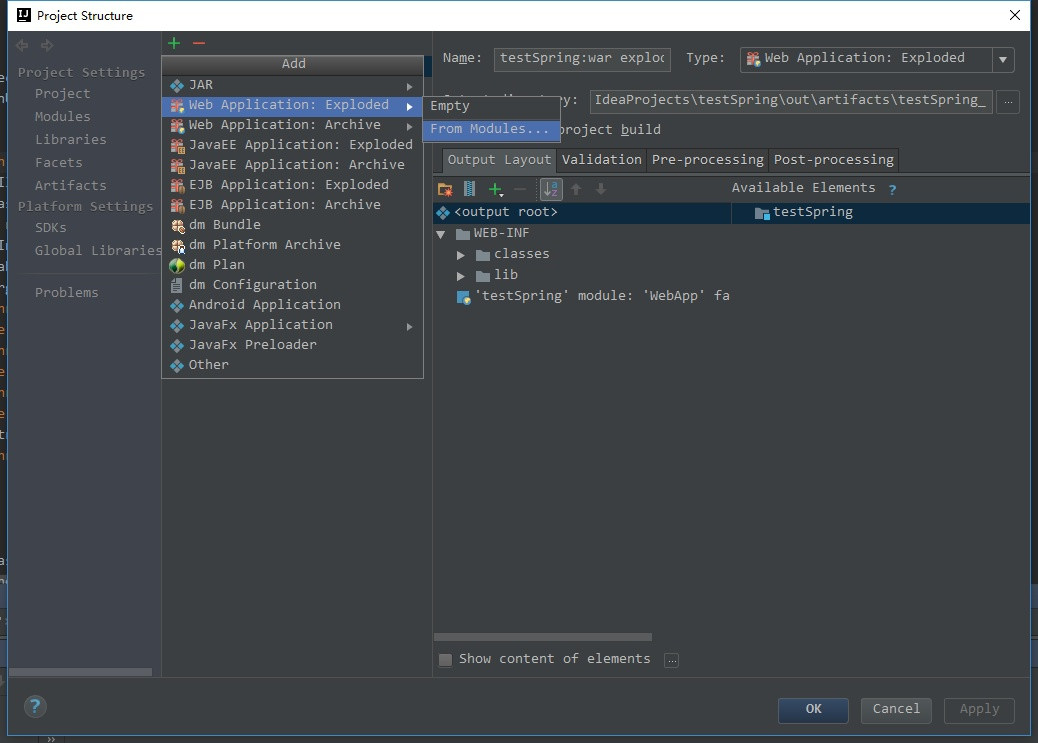
三、Web项目整合 Tomcat 的 Intellij 设置

1、Modules 增加 web 模块
2、增加 Tomcat 依赖库
3、设置 Artifacts
三、编写控制器类

1、注解控制器
@Controller
  负责注册一个bean 到spring 上下文中
@RequestMapping
  注解为控制器指定可以处理哪些 URL 请求,支持 Ant 风格(即?、*和的**的字符)和带{xxx}占位符的URL

2、处理入参
@PathVariable
  绑定 URL 占位符到入参
@RequestParam
  在处理方法入参处使用 @RequestParam 可以把请求参 数传递给请求方法
@CookieValue
 略
@RequestHeader
 略

使用 ServletAPI 对象作为入参
  SpringMVC 自动将 web 层对应的 Servlet 对象传递给处理方法的入参,如果自行使用 HttpServletResponse 返回响应,则处理方法的返回参数设置为 void 即可

3、处理模型数据

  • ModelAndView
    方法体通过该对象添加模型数据,既包含视图信息,也包含模型数据
  • @ModelAttribute
    在方法定义上使用 :Spring MVC 在调用目标处理方法前,会先逐个调用在方法级上标注了@ModelAttribute 的方法
    在方法的入参前使用 :入参的对象就会放到模型数据中
  • Map and Model
    入参为 org.pringframework.ui.Model、org.pringframework.ui.ModelMap 或 java。util.Map 时,处理方法返回时,Map中的数据会自动添加到模型中。
    调用方法前会创建一个隐含的的模型对象“隐含模型”,如果方法的入参为上述几种,Spring会将隐含模型的引用传递给这些入参,在方法体内可以访问到数据,也可以添加属性
  • @SessionAttitude
    将模型中的某个属性暂存到 HttpSession 中,以便多个请求之间可以共享这个属性
1
2
3
4
5
6
7
8
9
10
11
12
13
14
15
16
17
18
19
20
21
22
23
24
25
26
27
28
29
30
31
32
33
34
35
36
37
38
//控制器类Demo
@Controller
public class LoginController {
IFindUserService findUserService = null;
@RequestMapping(value = "/login", method = RequestMethod.GET)
public String login() {
return "loginPage";
}
@RequestMapping(value = "/user/{userID}", method = RequestMethod.GET)
public ModelAndView detail(@PathVariable String userID, ModelMap modelMap) {
UserInfo prepareUser = (UserInfo)modelMap.get("prepareUser");
System.out.println(prepareUser.getUsername());
UserInfo user = findUserService.findUser(Integer.valueOf(userID));
ModelAndView model = new ModelAndView();
model.setViewName("userDetail");
model.addObject("user", user);
return model;
}
@ModelAttribute(value = "prepareUser")
public UserInfo prepare() {
UserInfo user = new UserInfo();
user.setUsername("prepareUser");
return user;
}
public IFindUserService getFindUserService() {
return findUserService;
}
@Resource
public void setFindUserService(IFindUserService findUserService) {
this.findUserService = findUserService;
}
}

四、返回 JSON 数据

  待补充

五、 国际化

  略

六、文件上传

1、springmvc-servlet.xml 增加文件上传视图解析器CommonsMultipartResolver

1
2
3
4
5
6
<!--配置文件上传 MultipartResolver -->
<bean id="multipartResolver" class="org.springframework.web.multipart.commons.CommonsMultipartResolver">
<property name="maxUploadSize" value="5000000" />
<property name="uploadTempDir" value="WEB-INF/upload/temp" />
<property name="defaultEncoding" value="UTF-8" />
</bean>

2、添加依赖

1
2
3
4
5
6
7
8
9
10
11
<dependency>
<groupId>commons-fileupload</groupId>
<artifactId>commons-fileupload</artifactId>
<version>1.2.2</version> <!-- makesure correct version here -->
</dependency>
<dependency>
<groupId>commons-io</groupId>
<artifactId>commons-io</artifactId>
<version>2.4</version>
</dependency>

3、编写文件上传控制器类

1
2
3
4
5
6
7
8
9
10
11
12
13
14
15
16
17
18
19
20
//UserController
@Controller
@RequestMapping(value = "/user")
public class UserController {
@RequestMapping(value = "/uploadPage")
public String uploadPage() {
return "uploadPage";
}
@RequestMapping(value = "/upload")
public String upload(@RequestParam(value = "name") String name,
@RequestParam(value = "file")MultipartFile file) throws IOException {
if(!file.isEmpty()) {
file.transferTo(new File("D:/upload/" + file.getOriginalFilename()));
return "redirect:uploadResult";
}else
return "redirect:uploadResult";
}
}

4、编写上传页面

1
2
3
4
5
6
7
8
9
10
11
12
<html>
<head>
<title>上传用户头像</title>
</head>
<body>
<form method="post" enctype="multipart/form-data" action="/user/upload">
<input type="text" name="name" />
<input type="file" name="file" />
<input type="submit" />
</form>
</body>
</html>